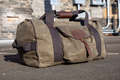
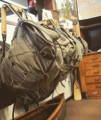
Crafting a Canoe Pack
Did you know that everything related to the Frost River brand is done under one roof?! From cutting our raw materials to marketing our packs, we all work together as team to propel the full cycle of manufacturing and selling waxed canvas softgoods.
There’s a lot that goes into a Frost River pack and we want to highlight all of the steps of crafting one of our favorites- the Grand Portage Canoe Pack. Every item in our line was born from the heritage of a traditional canoe pack! A lot of companies and brands will chase the newest fad or the latest and greatest Pantone color, but we stick to what we know best, form and function. With three levels of manufacturing, the shop always has something going on and there are important manufacturing processes that happen at each level. Now, let’s get crafting!
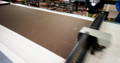
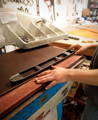
1. The Cutting of the Canvas
We receive full rolls of canvas that weigh up to 130lbs and are 60” long. Each one must be carried to the basement. We like to call this portage practice as we throw a roll over the shoulder and march downstairs. The rolls are loaded on the rack that feeds our 48 foot long cutting table. Prior to 2016 we had paper patterns and cut every piece of canvas by hand. Not only was this not time efficient but it also created more material waste and inconsistencies. We now use a CAD cutting table that saves time, fabric and ensures that every piece of the pattern is cut just the same as the last. After all of the canvas is cut and picked from the table the next step is to “kit”.
2. Kitting the Components
“Kitting” is the process of gathering every piece and component the sewer needs to put together a pack. Normally, packs are made in bundles of six, so the kit would hold everything you need to make six of the same pack. The canoe packs are so large and time intensive that we kit them in builds of three.
Once the canvas is added to the kit, the leather pieces are added. Each leather component has a steel die stamp and the leather is ‘clicked’ out by a hydraulic press machine called the ‘clicker’. For the Grand Portage, this consists of the long leather straps, side cinch straps, reinforcement backers for the back straps and stress points, leather for the buckles to be strung, straps to attach the tumpline and most important the oval logo that has been hot stamped in house with the Frost River brand.
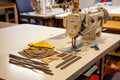
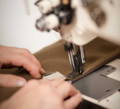
3. Putting together the pieces- also known as where the magic happens – at the sewing table!
Once the kit is complete it is taken to a sewer to attach all the pieces. Most of our items have a 1/2" seam allowance so that the item can be repaired if necessary. Our sewing team has a large array of items that they might make at a given time so, crafting instructions as well as a sample to look over is supplied. We use thick gauge needles and strong thread so that our overbuilt packs can hold up to the elements. We also use high-powered industrial sewing machines because it will have to be able to sew through sometimes two layers of leather and two layers of canvas. The sewing machines also have servo motors which only draw power when the pedal is down, reducing our energy consumption.
Our canoe packs go from a sewing station and to the finishing/riveting area a few times. This allows grommets to be placed in appropriate spots, rivets to be pounded in before gussets are joined or back straps and tumplines are added.
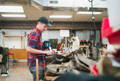
4. We don’t call it a finishing table for nothing
When an item arrives at the finishing table it is for one of many reasons. It could be to add grommets, cord and barrel, capped/flared or hand pound rivets, snaps, handles or straps or turned and burned which is typically the last step of crafting. Most of the machines in the finishing table look like they were built before World War I however, they are built well, cared for with pride and have continued to get the job done well for many years. Each one is custom to the size of grommets, rivets or snaps used. The Grand Portage Canoe Pack alone has 25 burly hand pounded rivets. There are no short cuts to take during this process- each one is hammered one at a time, snipped, hammered again and domed over so there are no sharp edges and checked over to insure a lifetime hold. When a product has all the stitches, leather and hardware that goes into it- the last step is burning all the thread ends and tacked area to insure a strong hold and turning the pack outside in.
5. Into the quality queue
Once the pack is ready for inspection- it is brought downstairs. Each one of our items in the arsenal has a document that shows all the places to look over. For the most part it is checking that all the features are in the pack and in the correct orientation. Hanging pockets, organizational panels and zippers include some of the features that are inspected. A thorough check to make sure everything is straight and all of the leather is sewn and riveted where it needs to be. A check to make sure the grommets are fastened all the way, the snaps are going to hold and zippers will function appropriately. Even skipped stitches are caught in the quality area. The quality inspection area is a very important place to make sure all the items we are sending out are of the quality we have built our reputation on. If it goes out our door you can be sure that it has been made well and looked over to make sure it will withstand the adventures you take it on.
6. On to the shelf, or out the door
Finished either ship out to customers or retail partners, or they head to the store to stock shelves allow customers to touch and try on before buying.
Don’t forget that Frost River offers free tours everyday! The shop has three levels of crafting and there is always something to see.